
Use the contact in the tools you already have
Scan the card, check the details and save the contact with your notes and follow-up. When you need that information elsewhere, open the contact and choose Send to your system.
Your receiving workflow can save it in a sheet or update your CRM, the system your team uses to manage customer information. You keep the conversation and next action with the contact instead of entering them again.
Card photo → text recognition (OCR) on your phone → review and save → chosen webhook send → mapping, enrichment and your destination
A webhook is a receiving web address. Sending information to it starts a workflow, a series of steps you have set up. That workflow can run in Zapier, Make, n8n, Workato, Tray.ai or your own system. It checks access and puts the information into the right fields in your destination.
This outgoing handoff is also called an outbound webhook.
Business cards are read on your phone with local machine learning, keeping the image and recognised text on the device during recognition. Contacts, notes and follow-ups stay on your phone by default. A chosen send transfers that contact and its saved activity to your configured receiver, which may store or process it. Choose who can access it there.
Use the original text for mapping, enrichment and AI
Give your workflow more context than the saved contact fields alone. When available, NexHello also sends the original source text in raw.payload, with its type in raw.payload_type. For a card photo, this is the text read by OCR, which turns words in a picture into text. It can also be QR text, pasted text or imported contact fields.
Your saved contact fields contain the details you reviewed. The original text gives a downstream workflow another source to work from, for example to find a department or a second job title that you did not map into a saved field. Card images are not sent. Original text is included by default when available, but a size limit can omit it from a large request.
In your receiving platform, you can add steps to:
- Map the information: put contact details, notes and follow-ups into the fields your destination uses.
- Enrich the record: look up an existing customer or company in an approved data source and add useful details, with rules for matching the right record.
- Use AI where it helps: pass original text and selected saved details to a large language model (LLM) to suggest field mappings, organise information or draft a summary for review. Check its output before updating important records or sending messages.
From there, send the result to Salesforce, ActiveCampaign, HubSpot, Airtable or another system supported by your receiving platform. Choose a platform such as Zapier, Make, n8n, Workato or Tray.ai, then check that its connector supports the action you need and that your account has the required access. A connector is the platform’s link to that service. Your workflow needs its own setup, field mapping and testing.
These are steps you configure after the webhook receives the contact. An external AI or enrichment service receives the information your workflow passes to it, including any original text you choose to use. Review access and data handling in those services before sending real contact information.
Not sure how to build your particular flow? Copy an AI prompt to plan your receiver and CRM steps. Describe your tools, the notes you want to keep and what should happen next.
Choose a starter workflow
Start with the example closest to your next step. Each free template is provided as-is. You are responsible for finishing its setup, testing the workflow and making it ready for everyday use with real contacts. NexHello access, platform accounts and service charges are separate.
| Start here | What the configured example does |
|---|---|
| Notion with Zapier | Screenshot walkthrough to find, create and update a Notion contact. Build it in your own accounts; no download is included. |
| Make.com basic receiver | Receives the contact, checks for two fields and returns a message. Add storage, email or CRM steps as your next stage. |
| Google Sheets with n8n | Saves selected contact fields to your own sheet. Sending the same saved contact again updates its row. |
| Workato contact receiver | Creates or updates a table record by contact ID and can email a configured address when a new row is created. |
These examples give you a starting flow. Salesforce, HubSpot, ActiveCampaign or another CRM needs its own configured destination steps. Talk to Naonis about a custom implementation if you would like help with the workflow, matching rules or ongoing support. Scope and fees are agreed before work starts.
Set up your connection in NexHello
You need access to NexHello, connections enabled in your app, internet for sending and a receiving workflow. Have its HTTPS webhook URL ready. This is the full receiving address, starting with https://. The app uses one saved connection at a time.
For app access or restoring a purchase, see subscriptions and restoring purchases.
If Connect your systems is missing, ask for webhook access through in-app support.
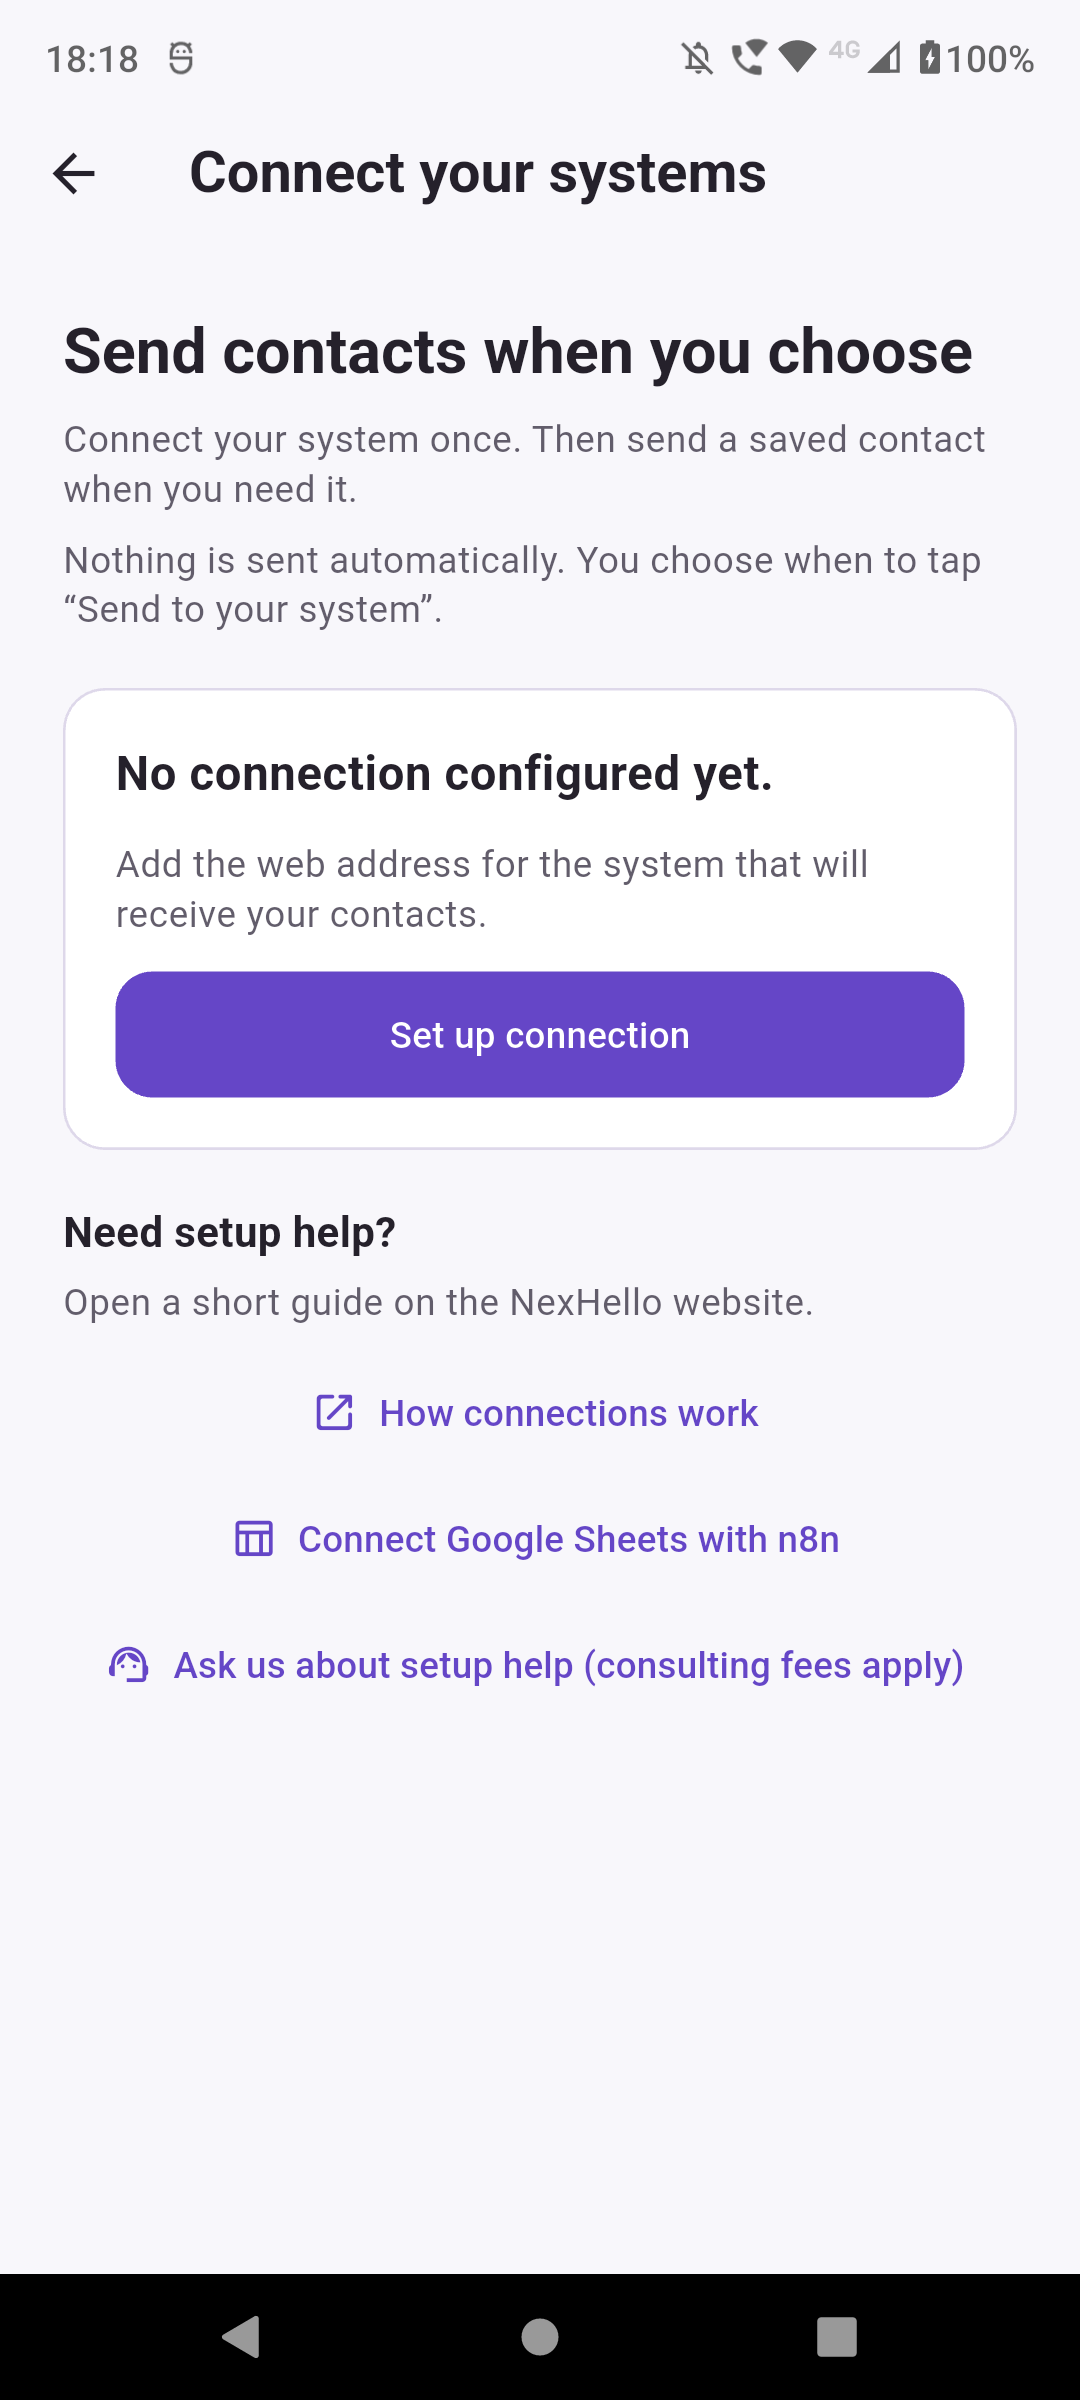
1. Open Set up connection
In NexHello, open Settings → Connect your systems → Set up connection. On the connection page, tap Set up connection to open the form.
2. Add the URL and matching authentication
Paste the full receiving address into Webhook URL. Authentication lets the receiving system check that a request has the right password, key or token. Choose the Authentication type used by your receiving workflow.
| Authentication type | What to enter |
|---|---|
| No authentication | No password or key. Choose this only if your receiving workflow is set up that way. |
| Basic auth | The receiver’s username and password. |
| Bearer token | The secret token supplied by the receiving service. NexHello adds the Bearer prefix for you. |
| API key header | The Header name and secret Header value from the receiving service. A header is a named part of the message used here to carry the key. |
| Custom header | The agreed header name and value. |
Copy the names and values exactly. For example, the Make guide uses x-make-apikey as the header name; the Workato sample uses NexHello. Your receiving workflow supplies the secret value.
3. Check the remaining settings and save
User identifier is optional. Leave it blank unless your workflow needs a name or code to identify the sender. NexHello supplies an identifier for you. If you enter your own, use lowercase letters, numbers and underscores. It does not replace a password or key.
Wait for a reply (seconds) starts at 20. Start with that value. If later steps take longer, your workflow can reply that it has received the contact and continue processing. Check those later steps in the receiving system.
With Require unlock to use saved credentials on, unlock your phone when asked before sending. This protects access to the saved password or key. Your phone needs a screen lock for that check to work.
When editing a saved connection, its password or key stays hidden. Leave all authentication fields blank to keep the saved details, or complete every field to replace them.
Tap Save to store the setup, or Save and test connection to save it and send a test message. When managing a saved connection, keep Connection enabled on for sends to work.
Test the connection, then send a fictional contact
The connection test sends a message labelled webhook.test. It has no contact details. Set your workflow to recognise this test and reply without saving a contact or sending email. A workflow that expects a contact may reject the test even when the address works.
Then test the real flow:
- Save a fictional contact such as Taylor Example, with a surname, a note and a follow-up.
- Open that saved contact and tap Send to your system. Complete the phone unlock prompt if asked.
- Check the receiving workflow and the actual destination record. Check any email step separately.
- Change the test contact or follow-up and send it again. Confirm the intended update and repeat-send behaviour.
You send one contact at a time. Saving or editing it does not trigger a send. The app sends the chosen contact’s saved activity together; your receiver decides which fields to use. When available, original text from a QR scan, card photo, pasted text or imported contact is sent with its source type. The photo image is not sent. A failed send leaves your local contact intact. Configure required-field checks, such as surname or company, in your receiving workflow.
After your system replies with HTTP 200, Contact detail shows Sent to your system with the local date and time. This means your system replied successfully; later work may still be underway. You can send the contact again; a later unconfirmed reply does not erase the previous send time.
Return a useful success or failure message
These response rules apply to all NexHello webhook destinations, including Make, n8n, Workato and your own system. Each reply has a numeric code called an HTTP status. NexHello reads that code to show success or failure. Your workflow can also return a message explaining what happened.
| Receiver’s HTTP response | What NexHello reports |
|---|---|
| Saved contact: HTTP 200 | NexHello shows the contact as sent and records the latest send time. |
| Saved contact: any other status, including 201 or 204 | NexHello does not update the sent time. Your system may still have received the contact, so check there before trying again. |
| Connection test: HTTP 200–299 | Success. A test has no contact and does not change a contact’s sent status. |
| Other status | Failure. For example, 401 can mean the password or key was rejected. 422 can mean contact details are missing. |
| No reply before the wait expires | A timeout. Check the workflow before repeating an action that may already have run. |
To show your own message in NexHello, use JSON, a text format for exchanging information between systems. Set the response header to Content-Type: application/json and return a text field called response:
{"response":"Contact received. Your CRM update is queued."}For a rejected request, return a suitable failure status, such as HTTP 422, with a useful message:
{"response":"Add a surname to this contact, then send it again."}The code decides the result. A 200 reply with an error message still reports success. A 422 reply still reports failure. Without a usable response message, NexHello shows its usual result text. Messages display as plain text, up to 1,000 characters.
For a saved contact, NexHello marks it as sent only after HTTP 200. A 201 or 204 response may mean something useful to your system, but NexHello leaves the previous send time unchanged. Connection tests continue to accept any 200–299 response. HTTP 200 means your system replied successfully; some services reply before saving a row or sending an email. Make your message clear about what has finished, then check the receiving system for the final result.
Details for the person building the workflow
Use this section when you need to choose data fields or handle repeated requests. If you are following a starter template, its guide takes you through the first working example.
See data fields, a JSON example and rules for repeated sends
What your receiving workflow gets
NexHello sends an HTTPS POST request containing JSON, with Content-Type: application/json. A normal saved-contact send uses the event contact.activity.recorded and schema version 1.0.
| Field | What you can use it for |
|---|---|
data.contact | Contact ID, name, company, job title, About this person and contact methods. The contact ID stays the same when you edit that saved contact. |
data.interactions | Saved conversations and notes, with their IDs, kinds, statuses and times. |
data.follow_up_actions | Next actions, status, schedule and reminder details. |
data.follow_up_events | Follow-up history, including creation, rescheduling, completion, cancellation and reopening. |
data.changes | Identified activity changes that the receiving workflow can interpret. |
raw.payload_type, raw.payload | Original source text and its type, when available. This can be QR text, text read from a photo, pasted text or imported contact fields; image bytes are not sent. |
event_id, sent_at, source | Codes and information identifying the activity, when it was sent and which app sent it. |
delivery | Codes identifying the request and related activity, including delivery_id and idempotency_key. A large send may also have part numbers. |
Contact methods arrive in lists named phones, emails, websites, linkedin_links and addresses. Each item has a value and an is_primary flag. The simpler phone, email, website, linkedin and address fields hold the primary value, or null when there is none. Use the lists when you need every saved method.
This shortened example uses fictional details. The raw block appears when the contact has linked original source text and the request fits the size limit. Real requests contain more fields and saved history:
{
  "event": "contact.activity.recorded",
  "schema_version": "1.0",
  "event_id": "example-event-1",
  "sent_at": "2026-10-18T06:00:00Z",
  "data": {
    "contact": {
      "id": "example-contact-1",
      "first_name": "Taylor",
      "last_name": "Example",
      "full_name": "Taylor Example",
      "about_this_person": "Met at the conference. Send the service overview.",
      "email": "[email protected]",
      "emails": [{"id": "example-email-1", "value": "[email protected]", "is_primary": true}]
    },
    "follow_up_actions": [{
      "id": "example-follow-up-1",
      "contact_id": "example-contact-1",
      "title": "Send the service overview",
      "type": "send_information",
      "status": "open",
      "due_local_date": "2026-10-20"
    }]
  },
  "raw": {
    "payload_type": "vcard",
    "payload": "BEGIN:VCARD\nFN:Taylor Example\nEND:VCARD"
  },
  "delivery": {
    "delivery_id": "example-delivery-1",
    "idempotency_key": "example-event-1",
    "mode": "snapshot",
    "user_id": "example-installation",
    "user_confirmed": true
  }
}
The X-Webhook-Event, X-Webhook-Schema-Version and X-Webhook-Delivery-Id headers identify the message type, format version and request. Activity times use UTC, a common time standard. Follow-ups can also include a local date/time and a time zone such as Australia/Sydney. Allow for missing optional fields and empty lists. The request does not include card image files.
Each request has a 512 KiB size limit. With a long history, NexHello may send less detail or split it into parts. The fields delivery.chunk_index and delivery.chunk_count identify the part number and total number of parts. Process the fields present in each part; it may not contain the full history.
Avoid repeated records or messages
If the network or server has a temporary problem, NexHello normally tries up to three times. This includes a server asking it to slow down, known as a rate limit. It does not keep syncing in the background. The first request may have arrived even if its reply was lost, so your workflow must handle a request arriving again.
Use data.contact.id to update the same saved contact in your destination. Two separately saved contacts have different IDs, even when they describe the same person. That matching is separate from finding duplicate people by email or another business rule.
Retries of the same request reuse its delivery_id; a later chosen send gets a new one. The idempotency_key links a request to the activity or part it describes. A later send can have the same key with updated contact fields. Compare the incoming details before skipping an update. Decide separately when to send another email or run another action.
Build the next step around your process
Start with one useful result, such as updating a customer record or sending the contact to the right team. Decide how to match existing records, which details to keep and where a person should review the result before adding more steps.
For a short reminder of the in-app steps, see Connect NexHello to another system. If you are new to the app, get started with capture and follow-ups. Sending a contact is separate from saving a backup or moving phones.
Common questions
Can a business card scanner send contacts to my CRM?
Yes, through a connection you set up. NexHello sends the checked contact, notes and follow-ups to a receiving web address called a webhook. Your CRM can receive it directly if it supports that format, or you can use Make, n8n or Workato to add the CRM steps. Connection access must be enabled in NexHello.
Does scanning a business card send it automatically?
You choose each send. Scan, check and save the contact, then open it and tap Send to your system. Saving or editing a contact does not send it automatically. The send needs internet and a working, enabled connection.
Can I send notes and follow-up information too?
Yes. A chosen contact send includes saved contact details, About this person, interactions, follow-up actions and follow-up history. Your receiving workflow decides which fields to store or use. Card image files are not included.
How can my system show a success or error message in NexHello?
Your receiving system returns a reply code and can include a message. For a saved contact, HTTP 200 confirms receipt in NexHello. Connection tests accept 200 to 299. Other replies do not confirm a contact send. Put your message in a JSON field called response, as shown below. These rules apply to every connected system.
Do I need an API or a native CRM connector?
You need a system that can receive NexHello’s webhook message, either directly or through a tool such as Make, n8n or Workato. Those tools can then connect to your CRM. The connection sends information out when you choose. Other apps cannot use it to read or edit records on your phone.
Accounts and help
Need help choosing an approach or connecting your systems? Tell Naonis which tools you use and what should happen next. Explore custom CRM and integration work, or contact Naonis about paid integration help ↗. We agree the work, fees and any ongoing support before starting.