
From a checked contact to your own workflow
Scan a business card in NexHello, check the details and save the person with the conversation notes and next action. When your team needs that information elsewhere, open the contact and choose Send to your system.
Scanned card → reviewed contact and follow-ups → chosen send → Make.com → your configured next step
Make calls a series of workflow steps a scenario. A webhook is its receiving web address. Your chosen send starts the scenario, so the next step can use the details without you entering them again.
Start small with the free blueprint
The basic Make blueprint is a starter workflow file you can import into Make. It requires configuration in your own account before use.
It receives a contact, checks for two fields and follows a success or failure path. In Make, the If-else step uses Exists to look for data.contact.id and data.contact.last_name. This checks whether the fields are present. Add checks for any other details your process needs and set up authentication to protect access.
Once the receiver works, you can add storage, email, duplicate checks or AI steps. You can also add updates to your CRM, the system you use to manage customer information. Those additions are separate from the basic download.
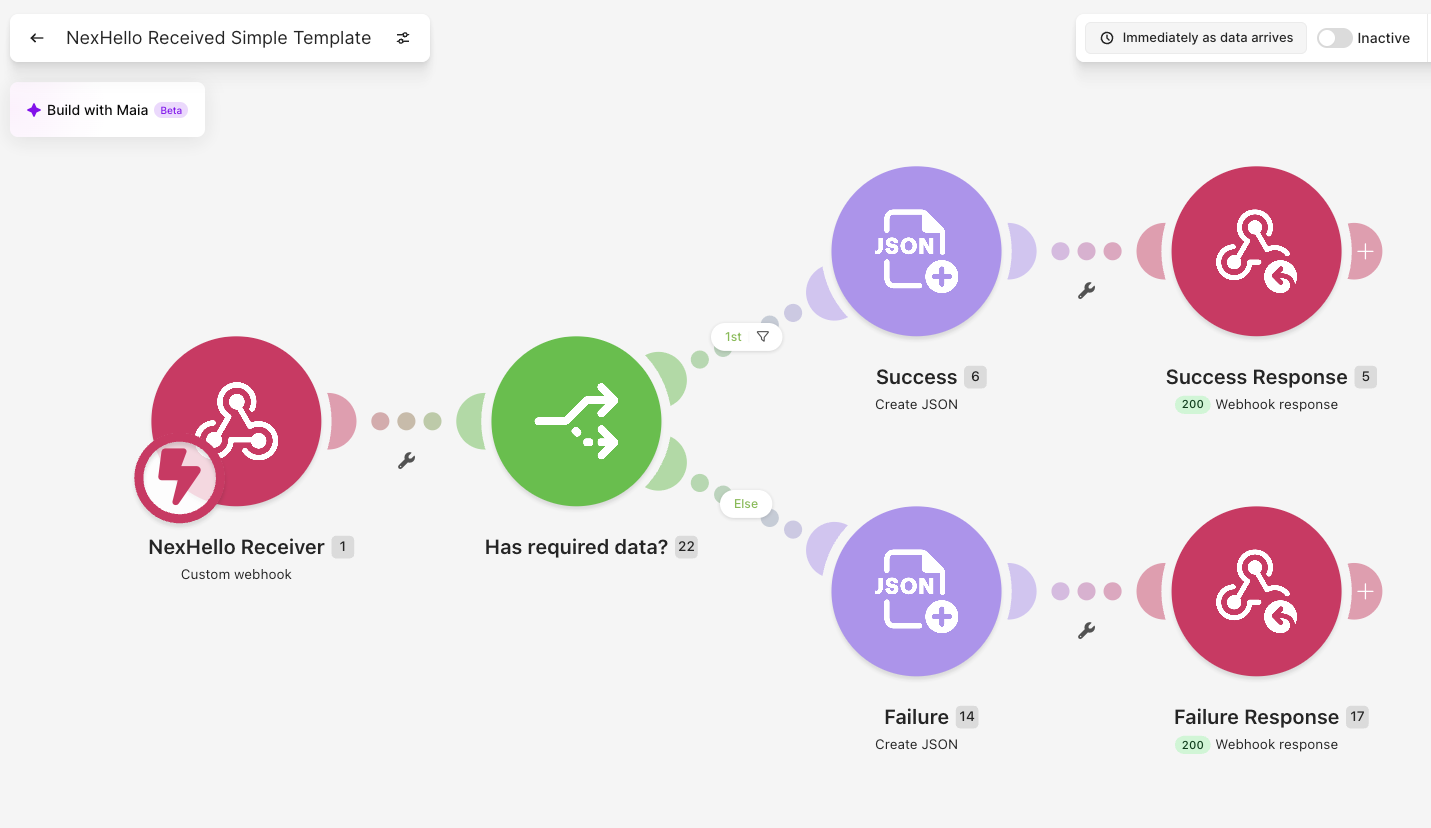
The template is free and provided as-is. You are responsible for finishing the setup, testing the workflow and making it ready for everyday use with real contacts.
NexHello access, Make account and usage costs and other services are separate. If you would like help with setup, custom changes, maintenance or support, talk to Naonis about paid implementation work.
What you need
- Access to NexHello, with connections enabled in your app.
- A Make account with the modules and features your scenario needs. Availability and charges depend on your account and plan.
- Internet for sending and a fictional contact with a surname, such as Taylor Example. Add a test note and follow-up so you can check more than the name.
Contacts, notes and follow-ups stay on your phone by default. You choose which contact to send, when to send it and which system receives it. The send transfers that contact and saved activity to Make; card image files are not included. Choose who can access it there. Review what Make stores while processing and in its history of each run.
1. Import and connect your own webhook
Create a new Make scenario. In its editor, open the three-dot menu, choose Import blueprint, select the JSON and save.
Open NexHello Receiver, the Custom webhook module. Create and select your own webhook. Make gives you a new HTTPS URL.
Configure API Key authentication for that webhook. In NexHello, open Settings → Connect your systems → Set up connection. Enter the URL, choose API key header, set the header name to x-make-apikey and enter the same key. Keep the URL and key private. User identifier is optional and separate from authentication.
Use Make’s listening or Run once mode while setting up. Send a fictional saved contact from NexHello so Make can learn its fields. If fields are missing, use Detect new values and send it again. Keep JSON pass-through off so Make separates the message into fields that these steps can read.
2. Set up the JSON and HTTP responses
A reply tells you what Make accepted. JSON is a text format used to exchange information between systems. In both Create JSON steps, named Success and Failure, select or create a data structure named Response. This defines the reply’s fields. Add one required text field called response and use it for both messages.
Use messages that describe what the scenario actually did. For this receiver, a suitable success body is:
{"response":"Contact received by Make."}A suitable failure body is:
{"response":"Required contact details are missing. Check the contact and try again."}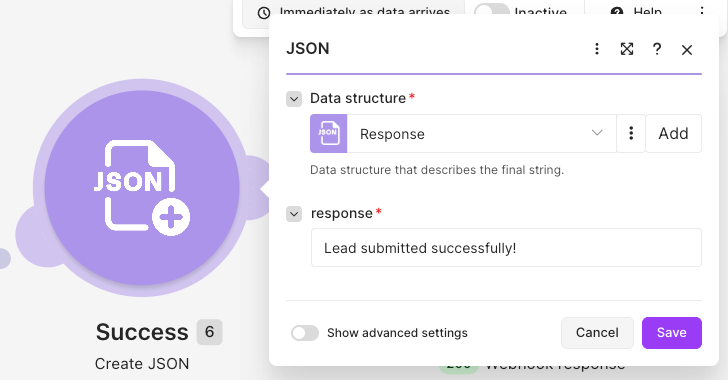
Open both Webhook response modules. Status is the HTTP result code returned to NexHello. Set:
| Setting | Success Response | Failure Response |
|---|---|---|
| Status | 200 | 422 |
| Body | Select the JSON output from Success | Select the JSON output from Failure |
| Custom header | Content-Type = application/json | Content-Type = application/json |
Select the generated JSON text directly, without adding another pair of quotes. Use Success for the success path and Failure for the failure path.
This table configures the two branches in this blueprint. The shared webhook response rules explain how NexHello reads status codes and messages for any receiving system.
3. Check the contact and follow-up information
Save your scenario and enable immediate processing when ready. Send a fictional saved contact through Send to your system and inspect the Make execution, its record of the run. Check the field checks, reply path and information received:
Use data.contact for the contact and data.follow_up_actions for the saved follow-ups. The shared data reference explains all the fields, contact methods, activity history and request IDs.
To save one record per follow-up, add Make steps that work through the list one item at a time. Choose where each action ID, status and schedule goes. Receiving the list alone does not save it.
Change the test note or follow-up in NexHello and send the same contact again. Confirm the updated information arrives. This basic receiver has no storage or duplicate handling, so this checks receipt rather than a saved update. Also test a request missing a checked field: it should take the failure branch and return 422.
The app’s connection test sends webhook.test without contact details. This blueprint routes it to the contact-check failure branch. With its 422 failure response, the test can report failure even though Make received it. For a successful connection-only check, add a separate webhook.test branch before contact validation and return 200 with {"response":"Connection received by Make."}. Keep that branch out of contact storage and email steps. A fictional contact send still tests your actual contact flow.
For longer Make scenarios, follow the shared guidance on reply timing and later steps.
Build the next step with Naonis
Once the receiver works, add your team’s next action. The separate example below saves a record in a Make data store, a built-in place to keep information. A router splits the flow into paths for email and a reply. This example is not included in the download. Choose how to match existing records and when email should run, then test repeated sends.
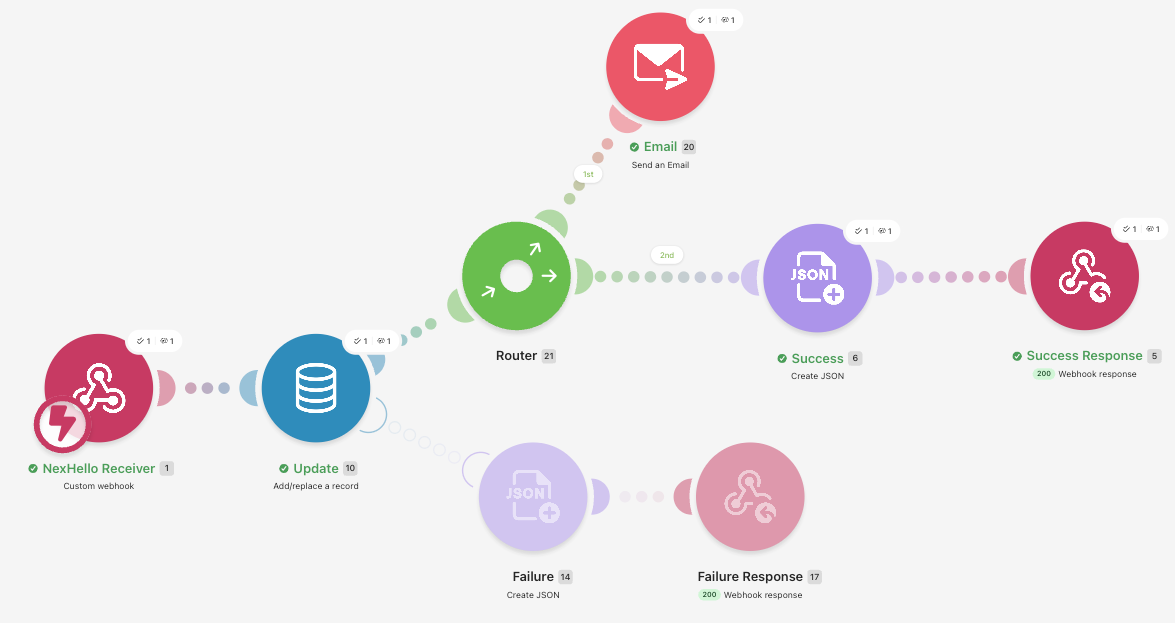
There are many ways to build on the handoff:
| What your team needs | Possible custom implementation |
|---|---|
| Shared contact and follow-up records | Store selected fields in a Make data store, spreadsheet or CRM, with rules for updating existing records. |
| The right person to take the next step | Route by an agreed field, assign an owner or email your team with the context they need. |
| Fewer repeated records or emails | Use contact IDs to update the right record. Separately, check whether a message has already been processed before repeating an action. |
| Help understanding notes | Send chosen details to an AI service for a suggested summary, category or draft. Decide who checks the result and which information the service receives. |
| A process that handles problems | Check required details, ask for approval where needed, and notify someone when a step fails. |
These are possible extensions, not features of the basic download or promises of a particular result. For email, choose the recipient and trigger so each message supports the agreed next step. External AI APIs receive the information you choose to send to them. NexHello’s local card recognition is a separate step.
Talk to Naonis about a custom Make implementation. Tell us which system you use, which details should arrive and what should happen next. Scope, fees, responsibilities and any ongoing support are agreed before work starts.
Choose the platform you already use
- n8n and Google Sheets: start with selected contact fields in a sheet.
- Workato: start with a contact table and optional new-contact team email.
- NexHello connection Help: find the app setup and chosen-send controls.
For Make’s own instructions, see importing blueprints, custom webhooks and responses, JSON modules and data stores.
Need a different destination or next action? Use an AI prompt to plan your workflow with your contact details, notes and follow-ups.
Common questions
Can NexHello send follow-up information to Make.com?
Yes. With connections enabled and configured, choose Send to your system from a saved contact. NexHello sends the contact and saved activity, including notes, follow-up actions and follow-up history. Configure Make to use those fields. Sending needs internet; card image files are not included.
Does the free Make blueprint save contacts or send email?
The basic download receives a contact, checks for its ID and surname, then replies to NexHello. It requires configuration. Saving records, sending email and using AI are extra steps you can add. The pictured storage and email example is not included in the download. Ask Naonis about a custom implementation.
How does Make tell NexHello whether a send succeeded?
Use HTTP 200 when the contact is accepted and 422 when required contact details are missing. NexHello uses that status to show success or failure. The response field sets the message you see. Map each branch’s JSON into its response body and set Content-Type to application/json on both.
Why does the connection test have no contact details?
The app sends a test message labelled webhook.test, with no contact. This template expects contact details, so it takes the failure path and replies with 422. Add a separate path that recognises webhook.test and returns 200. Then send a fictional saved contact to check the actual contact flow.
Is User identifier compulsory for Make?
No. User identifier is optional and NexHello supplies an identifier when it is blank. Use a custom value only when your workflow needs it. Configure webhook authentication separately.
Is the Make blueprint free?
The template is free and provided as-is. You are responsible for finishing the setup, testing the workflow and making it ready for everyday use with real contacts. NexHello access, Make account and usage costs and other services are separate. Ask Naonis if you would like paid help with setup, custom changes or ongoing support.
Will this remove duplicates or send automatic follow-up emails?
You choose each contact send. Extra Make steps can check for an existing record, choose who receives the information and send an agreed email. Those steps need their own rules for matching contacts and avoiding repeated messages. Talk to Naonis about adding them.
Accounts and help
Referral link: Naonis may earn a commission if you sign up through this link.
Need help choosing an approach or connecting your systems? Tell Naonis which tools you use and what should happen next. Explore custom CRM and integration work, or contact Naonis about paid integration help ↗. We agree the work, fees and any ongoing support before starting.